
Learning how to build a sales funnel in WordPress lets you sell like the big funnel platforms do, without paying them a monthly fee or moving your site.
You get focused landing pages, a clean checkout, order bumps and one-click upsells. And you keep your content, your customer data and your domain in one place.
This guide uses WooCommerce and CartFlows and walks through 12 steps, from the first landing page to tracking what converts. I’ll also cover the types of funnels you can build, what you need before you start, and the tweaks that lift sales once the funnel is live.
- What is a Sales Funnel?
- Why Build Your Funnel in WordPress?
- Types of Funnels You Can Build
- Things Needed to Build a Sales Funnel
- Choosing A Sales Funnel Plugin
- How to Build a Sales Funnel in WordPress with CartFlows
- Step 1: Set up WooCommerce and Add Your Product
- Step 2: Install CartFlows
- Step 3: Create a Funnel from a Template
- Step 4: Build the Landing Page
- Step 5: Set up the Checkout Page
- Step 6: Add an Order Bump (Pro)
- Step 7: Add a One-click Upsell or Downsell (Pro)
- Step 8: Customize the Thank-you Page
- Step 9: Connect Email Follow-up
- Step 10: Add Tracking
- Step 11: Test Before You Send Traffic
- Step 12: Drive Traffic to Your Funnel
- Ways to Improve Your Funnel Once It’s Live
- FAQs Related to How to Build A Sales Funnel in WordPress
Quick answer: WordPress plus WooCommerce and CartFlows can replace a paid funnel platform. The guide has 12 steps: landing page, checkout, order bumps, upsells and tracking. It covers funnel types, the tools you need and how to choose a funnel plugin. There’s a section on improving conversions after launch. Best for: WordPress site owners selling products, courses or services who want to own their data.
What is a Sales Funnel?
A sales funnel is the path a person takes from first hearing about you to buying. It’s called a funnel because many people enter at the top and fewer reach the bottom.
Most models use some version of AIDA:
- Awareness: someone finds you through search, social, an ad or a referral.
- Interest: they read your content or landing page and want to know more.
- Desire: they see how the product solves their problem.
- Action: they buy, sign up or book.
A website funnel turns those stages into pages. Instead of dropping visitors on a busy shop page, you send them to one page with one offer and one button.
Why Build Your Funnel in WordPress?
- No extra platform fee. Funnel SaaS tools charge monthly. WordPress funnel plugins are a one-site annual license or free.
- You own everything. Customer data, pages and design stay on your site.
- Your content feeds it. Blog posts that rank in Google can link straight into a funnel.
- Flexibility. Any payment gateway, email tool or page builder you already use will work.
The only limitation is that you’re responsible for hosting, speed and updates.
If you are comparing WordPress with hosted funnel tools, read the Systeme.io review. Its free plan is a fair benchmark for what you get without WordPress.
Types of Funnels You Can Build
| Funnel | Goal | Pages |
|---|---|---|
| Lead magnet funnel | Grow your email list | Opt-in page, thank-you page, email follow-up |
| Product sales funnel | Sell one product | Landing page, checkout, upsell, thank-you |
| Tripwire funnel | Turn new leads into buyers with a low-price offer | Opt-in, low-price offer, upsell |
| Webinar funnel | Sell a course or service | Registration, confirmation, replay, offer |
This guide builds a product sales funnel, because it covers every piece. You can trim it into any of the others.
Things Needed to Build a Sales Funnel
- WordPress hosting that’s fast and reliable. Checkout pages can’t be fully cached, so a slow server hurts sales directly. See our best WooCommerce hosting providers.
- WooCommerce to handle products, orders and payments.
- A lightweight theme. Astra, Kadence or GeneratePress all work. Astra is made by the same company as CartFlows, so they fit well together. See our Astra theme review and our list of the fastest WordPress themes.
- A funnel plugin. We use CartFlows here.
- A page builder or the block editor to design your pages.
- An email marketing tool to follow up with leads and buyers.
- Analytics to see where people drop off.
Choosing A Sales Funnel Plugin
| Plugin | Free version | Paid from | Strong points |
|---|---|---|---|
| CartFlows | Yes (landing, checkout, thank-you pages, templates) | $149/year (1 site) | Easy templates, works with block editor and Elementor |
| FunnelKit | Yes (Funnel Builder Lite) | Annual plans | Deep WooCommerce checkout and automation features |
| WooCommerce alone | Yes | Free | Fine for a simple store, no order bumps or one-click upsells |
How to Build a Sales Funnel in WordPress with CartFlows
Let us learn how to create a sales funnel in WordPress using WooCommerce and CartFlows.
Step 1: Set up WooCommerce and Add Your Product
Install WooCommerce, run the setup wizard, connect a payment gateway (Stripe, PayPal or WooPayments), then add the product you want to sell under Products > Add New.
Add a second, related product for your order bump and a third for your upsell.
New to WooCommerce? Our guide on how to build an online store covers payments, shipping and taxes in detail.
Step 2: Install CartFlows
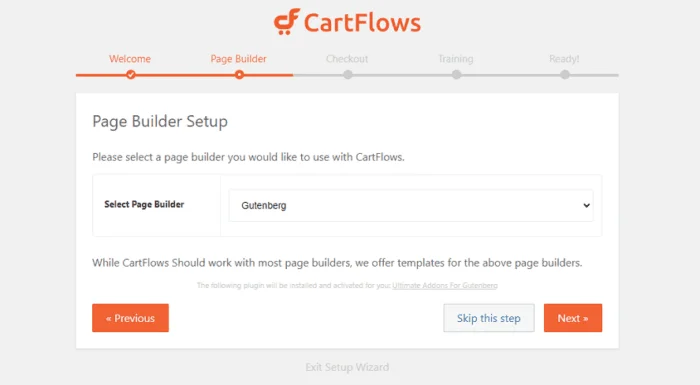
Go to Plugins > Add New, search “CartFlows“, install and activate.
The setup wizard asks which page builder you use and installs the matching templates.
If you bought Pro, install and activate the Pro plugin too and enter your license key.
Step 3: Create a Funnel from a Template
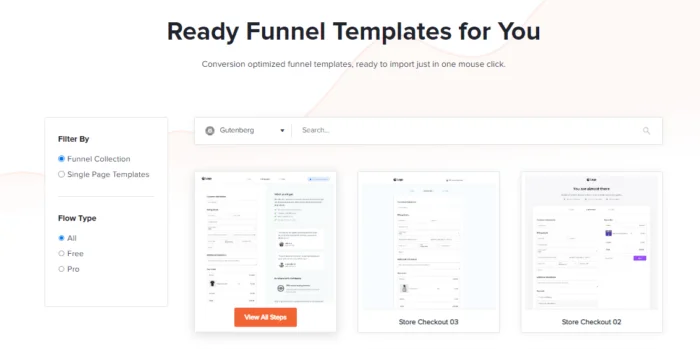
Go to CartFlows > Funnels > Add New. Browse the templates and filter by your page builder. Import one that matches your offer.
A typical template creates:
- A landing (sales) page
- A checkout page
- An upsell page (Pro)
- A thank-you page
You can also start from scratch and add steps one at a time.
Step 4: Build the Landing Page
The landing page has one job: get the click to checkout. Keep it focused.
- A headline that states the result the buyer wants
- A short subheading that says who it’s for
- One clear call-to-action button, repeated down the page
- Benefits before features
- Proof: real reviews, results or screenshots
- An FAQ that handles the main objections (price, time, refund)
- No main menu or sidebar to pull people away
Edit the page with your builder, then check it on a phone. Our on-page SEO techniques guide helps if you also want the page to rank.
Step 5: Set up the Checkout Page
Open the checkout step and choose your product. CartFlows replaces the standard WooCommerce checkout with a cleaner layout.
Good checkout habits:
- Ask only for fields you need. Turn off company name and second address line if you don’t use them.
- Show a short order summary and the total, including shipping and tax.
- Add trust signals near the button: secure payment badge, refund policy, support email.
- Offer a wallet option such as Apple Pay or Google Pay for faster mobile checkout.
Step 6: Add an Order Bump (Pro)
An order bump is a checkbox offer on the checkout page, such as “Add the printable workbook for $9”. It’s a small, related add-on that needs no extra page.
In the checkout step settings, open Order Bump, choose the product, write a one-line pitch and pick the position. Keep the bump price well below the main product’s price.
Step 7: Add a One-click Upsell or Downsell (Pro)
After payment, the buyer sees an upsell page with a related, higher-value offer. Because their card is already on file through supported gateways, they accept with one click.
If they decline, you can show a downsell (a cheaper version).
Make the upsell a natural next step: the main course, then the templates pack; the camera, then the lens; the theme, then a setup service.
Step 8: Customize the Thank-you Page
Confirm the order, tell them exactly what happens next (download link, shipping time, email to watch for), and give one more useful action: join your community, follow you, or read a getting-started guide.
Step 9: Connect Email Follow-up
Send buyers and leads into your email tool. Use a welcome sequence for buyers (how to get the most from the product) and a separate sequence for people who opted in but didn’t buy.
CartFlows works with most email tools through WooCommerce integrations or webhooks. Our post on how to boost affiliate income with email marketing has sequence ideas that apply here too.
To capture leads before they reach the funnel, a popup or opt-in tool helps. See our OptinMonster review.
Step 10: Add Tracking
You can’t improve what you don’t measure. Set up:
- Google Analytics 4 with ecommerce events (a plugin like MonsterInsights makes this easier)
- CartFlows’ built-in funnel analytics (Pro) to see visits and conversions per step
- Facebook Pixel or other ad pixels if you run paid ads
Watch these numbers:
| Metric | What it tells you |
|---|---|
| Landing page conversion rate | Is the offer and page convincing? |
| Checkout completion rate | Is checkout too long or confusing? |
| Order bump take rate | Is the add-on relevant and priced right? |
| Upsell take rate | Is the upsell a logical next step? |
| Average order value | Are bumps and upsells working together? |
Step 11: Test Before You Send Traffic
Put your payment gateway in test mode and go through the funnel yourself: landing page, checkout, bump, upsell, decline the upsell to see the downsell, thank-you page, and the order emails.
Do it again on a phone. Then switch off test mode.
Step 12: Drive Traffic to Your Funnel
A funnel with no traffic is just a nice set of pages. Send people in from:
- Your blog. Link relevant posts to the landing page. Our complete SEO guide covers ranking those posts.
- Email. Your list is your warmest traffic.
- Social media. See our social media strategies and Pinterest marketing guide.
- Paid ads. Start small and send ad traffic to the landing page, not your homepage.
More ideas in our guide on how to promote your blog to increase traffic.
Ways to Improve Your Funnel Once It’s Live
- Use A/B tests (CartFlows Pro) on one element at a time: headline, button text, price display.
- Shorten the checkout if completion is low.
- Swap the order bump product if fewer than one in ten buyers takes it.
- Add real testimonials as you collect them.
- Speed up your pages. A slow checkout loses buyers. See our tips to speed up a WordPress site.
FAQs Related to How to Build A Sales Funnel in WordPress
Can I build a sales funnel in WordPress for free?
Yes, partly. WordPress, WooCommerce and the free CartFlows plugin give you a landing page, a custom checkout and a thank-you page at no cost beyond hosting. Order bumps, one-click upsells and A/B testing need a paid plugin.
Do I need WooCommerce for a WordPress sales funnel?
For CartFlows, yes, because it uses WooCommerce for products and payments. A pure lead-generation funnel (opt-in page plus email) doesn’t need WooCommerce.
CartFlows or FunnelKit?
Both are solid. CartFlows is easier to start with and pairs naturally with Astra. FunnelKit has deeper checkout and automation options. Try the free version of each on a staging site.
Does a funnel plugin slow down my site?
Funnel pages are usually lighter than normal pages because they remove menus and sidebars. Hosting and your page builder affect speed more than the funnel plugin does.
How many steps should my funnel have?
Start with landing, checkout and thank-you. Add one order bump and one upsell once the basic funnel converts. More steps rarely help a new funnel.
Wrapping Up
You don’t need an expensive funnel platform to sell like one. WordPress, WooCommerce and a funnel plugin give you focused pages, a fast checkout and post-purchase offers on a site you own.
Build the simple version first, measure each step, and add bumps and upsells when you have steady traffic.
For more plugins that help a store grow, see our list of the best WordPress plugins.


